Introduction
The Elo scoring system was created by Arpad Elo, a Hungarian-American physics professor, and was originally used as a method for calculating the relative skill of players in zero-sum games, such as chess. The ranking system has since been used in a variety of sporting contexts, and since the Moneyball revolution has become ever more popular, primarily due to the fact that Elo rankings have been shown to have predictive capabilities.
A team’s Elo score is represented by a number which either increases or decreases depending on the outcome of games between other ranked teams. After every game, the winning team takes points from the losing one. The difference between the ratings of the winner and loser determines the total number of points gained or lost after a game; the number of points both lost and obtained are weighted according to the quality of the team, which accounts for unexpected results (aka sporting upsets). Although the initial number allocated to a team is somewhat arbitrary, most previous analyses have used 1,500 as the starting figure.
I’ve previously tried my hand at using Elo scores to predict match outcomes using Indian Premier League (IPL) match data and binary logistic regression. Though this continues to have good utility, the manner in which players are drafted and teams change from season to season in the IPL means that Elo scores are especially sensitive when used in this context. Also, the IPL has only been running since 2008, so data is limited, which can lead to relatively spurious findings. The model could predict wins based on massive differences in Elo scores between teams, but not when opponents were more evenly matched.
Therefore, I wanted to perform a similar sort of analysis on One Day International (ODI) Elo scores, as there is considerably more data for this format of the game (1972–2019). Furthermore, I wished to assess a variety of machine learning techniques, including hyper-parameter optimisation and cross-validation to determine the best model to estimate ODI match outcomes with Elo as the primary predictor. Using all ODI match data from Kaggle, I was able to create a few more feature variables to enrich models and subsequently improve accuracy. The iterative approach will be discussed below.
Methods
Prior to performing any of the nitty-gritty analysis or machine learning, you are going to be faced with the daunting task that will be all too familiar to any sports statistician: spreadsheet maintenance. I have used the EPSNcricinfo API before to loop through data, but (as previously mentioned) all ODI match data is available in Kaggle and comes in a format that is suitable for computing Elo scores. You can find my workings on Googly Analytics, which breaks down the formulae and methods used to calculate Elo rankings for international cricket. Once you have a suitable system in place, you can plot the Elo scores over time, which will give you a feel for how win and loss streaks affect overall performance of teams (Figure 1).
First, open Jupyter Notebook or your IDE of choice and install the necessary packages:
import pandas as pd
import seaborn as sb
import matplotlib.pyplot as plt
import plotly.graph_objects as go
import plotly.express as px
import chart_studio
import chart_studio.plotly as py
from sklearn.model_selection import train_test_split
from sklearn.linear_model import LogisticRegression
from sklearn.model_selection import GridSearchCV
from sklearn import metrics
import numpy as np
from sklearn.impute import SimpleImputer
from pylab import rcParams
from sklearn.neural_network import MLPRegressor, MLPClassifier
from sklearn.metrics import accuracy_score
from sklearn.ensemble import RandomForestClassifier, RandomForestRegressor
import joblib
import pandas as pd
from sklearn.metrics import accuracy_score, precision_score, recall_score
from time import time
Read in your Excel file, store it as a Pandas object and visualise the format of the data:
local = ‘/.../.../.../Elo_pred.xlsx’
elo = pd.read_excel(local)
elo.head(100)
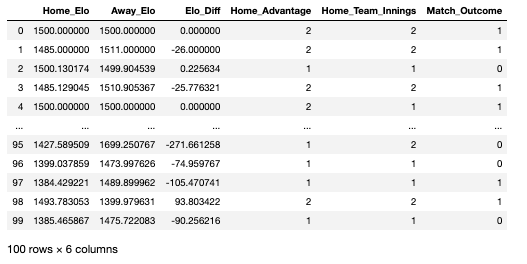
As seen in the data-frame above, there are a number of variables that I created prior to importing the Excel file. Each row in this data-frame represents a head-to-head fixture that happened any time between 1972 and 2019:
Home_Elo: the Elo score of the home team on the date of the fixture
Away_Elo: the Elo score of the away team on the date of the fixture
Elo_Diff: the difference in Elo between the home and away team
Home_Advantage: whether the game was won by the home team or not (2 = yes, 1 = no)
Home_Team_Innings: whether the home team batted or bowled first (2 = batted, 1 = bowled)
Match_Outcome: the variable we are looking to predict, represents the outcome of the fixture (1 = home team won, 0 = home team lost)
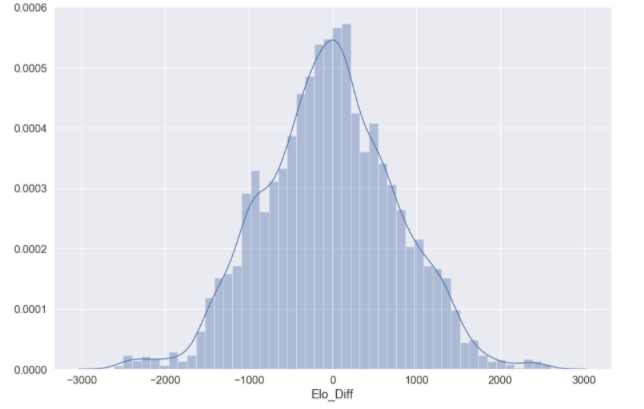
You may want to visualise the distributions of some of your predictor variables:
elo_dist = sb.distplot(elo['Home_Elo'])
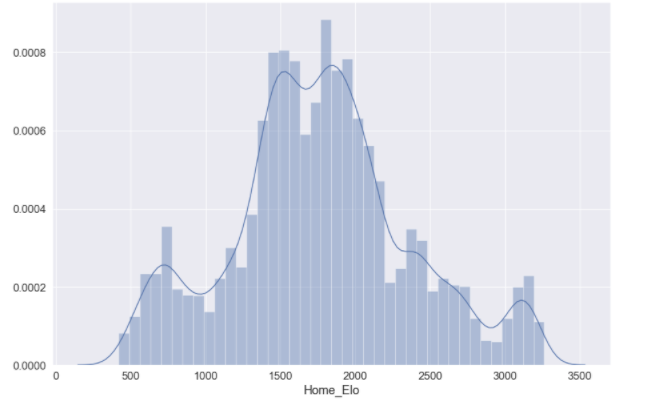
elo_dist = sb.distplot(elo['Elo_Diff'])
You’re now going to want to split your data into train, test and validation data. The training data will be used to train individual models, where the test data will be used to assess the accuracy of the models we have trained. We will then use a validation dataset at the end to assess model performance in comparison to all other models utilised. There is no option within Sklearn to split the data into three constituents; the following syntax will split the data into a standard train–test split of 60:40 and further divide the train dataset into train and validation constituents (20:20):
## Split features (x) and outcomes (y)
features = df[['Elo_Diff','Home_Elo', 'Away_Elo', 'Home_Advantage','Home_Team_Innings']].copy()
labels = df['Match Outcome']
## Train - test
X_train, X_test, y_train, y_test = train_test_split(features, labels, test_size=0.4, random_state=42)
## Validation
X_val, X_test, y_val, y_test = train_test_split(X_test, y_test, test_size=0.5, random_state=42)
To ensure your data has split correctly:
for dataset in [y_train, y_val, y_test]:
    print(round(len(dataset) / len(labels), 2))
> 0.6
> 0.2
> 0.2
Logistic regression
The first model we are going to train is a logistic regression. As we have a binary outcome measure, this is typically a good starting point; models are easier to train and logistic regression is suitable for binary problems. Prior to fitting the logistic model, it is important to ensure we are using the optimal hyper-parameters that we will pass into the Sklearn modules. The parameter that we are going to optimise is C, which controls the degree of regularisation the model will use. A low C value is equal to a degree of high regularisation and subsequently lower complexity, and a high C value is equal to lower regularisation and a higher degree of complexity. As this value essentially represents how closely the logistic model fits to the training data, a higher C value can lead to over-fitting.
The following function prints out the optimal input value for the parameter you pass through:
def print_results(results):
    print('BEST PARAMS: {}\n'.format(results.best_params_))
means = results.cv_results_['mean_test_score']
    stds = results.cv_results_['std_test_score']
    for mean, std, params in zip(means, stds, results.cv_results_['params']):
        print('{} (+/-{}) for {}'.format(round(mean, 3), round(std * 2, 3), params))
You can then store the input values you want to assess:
lr = LogisticRegression()
parameters = {
    'C': [0.0001, 0.001, 0.01, 0.1, 1, 10, 100, 1000]
}
And use GridSearchCV() on your training data to view the cross-validation of your input parameters:
log_cv = GridSearchCV(lr, parameters, cv=5)
log_cv.fit(X_train, y_train.values.ravel())
print_results(log_cv)
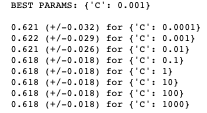
You can see that the recommended best input value for C is 0.001, indicating that we can achieve ~62% accuracy with a fairly high level of regularisation; which un-intuitively means a less “complex” fitting of the data.
We should store this best estimator for when we validate the logistic model against other models used:
joblib.dump(log_cv.best_estimator_, '/.../.../.../EloScores/LOG_model.pkl')
We can now fit our logistic model using the recommended hyper-parameters:
logreg = LogisticRegression(C = 0.001)
model = logreg.fit(X_train,y_train)
log_y_pred=logreg.predict(X_test)
You can print the accuracy of the model:
print("Accuracy:",metrics.accuracy_score(y_test, log_y_pred))
>> Accuracy: 0.6254467476769121
And print a confusion matrix for the model predictions:
%matplotlib inline
rcParams['figure.figsize'] = 10, 7
class_names=[0,1] # name  of classes
fig, ax = plt.subplots()
tick_marks = np.arange(len(class_names))
plt.xticks(tick_marks, class_names)
plt.yticks(tick_marks, class_nxmes)
# Create heatmap
sb.heatmap(pd.DataFrame(cnf_matrix), annot=True, cmap="YlGnBu" ,fmt='g')
ax.xaxis.set_label_position("top")
plt.tight_layout()
plt.title('Confusion matrix', y=1.1)
plt.ylabel('Actual label')
plt.xlabel('Predicted label')
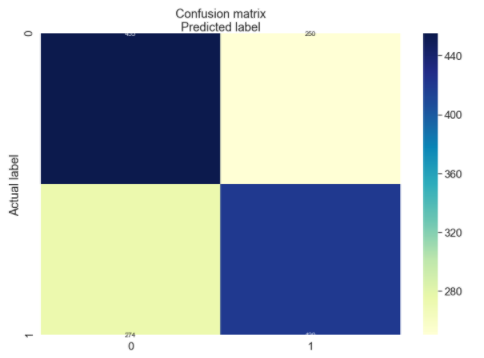
[274, 420]])
Random forest model
As seen above, we achieved ~62% accuracy with a basic binary logistic regression, which is a good starting point but leaves a lot to be desired. The next model we will train is a random forest model.
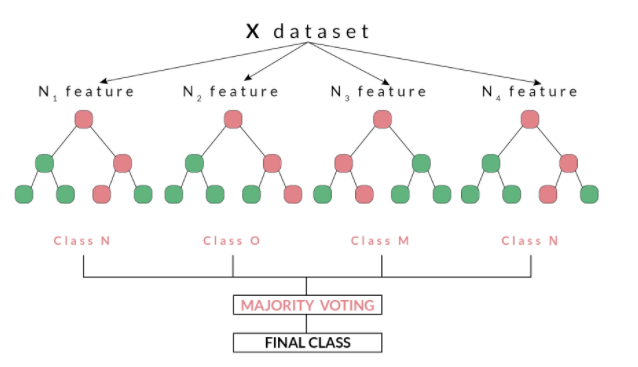
Random forests, as suggested by its name, consists of a large number of individual decision trees that operate as an ensemble. Each independent decision tree provides a classification outcome, and the class with the highest proportion of outcomes is elected as the prediction for that individual classification (Figure 2). The random forest model works on the premise that “A large number of relatively uncorrelated models (trees) operating as a committee will outperform any of the individual constituent models.” Tony Yiu explains that “The low correlation between models is the key. Just like how investments with low correlations (like stocks and bonds) come together to form a portfolio that is greater than the sum of its parts, uncorrelated models can produce ensemble predictions that are more accurate than any of the individual predictions. The reason for this wonderful effect is that the trees protect each other from their individual errors.”
For this reason, random forest models have good utility for classification problems and will be used on our match outcome data, which is in binary format.
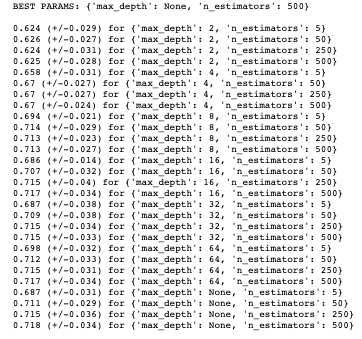
Before fitting our random forest model, we will tune some hyper-parameters as we did for our logistic model. The print_results() function used before will print the optimal hyper-parameters for our random forest using the same training data. The parameters we are going to optimise are n_estimators,which is the number of decision trees in the forest, and the max_depth, which is the depth of the tree. The default for max_depth is “None”, which means the nodes are expanded until all leaves are pure or until all leaves contain less than min_samples_split samples:
rf = RandomForestClassifier()
parameters = {
    'n_estimators': [5, 50, 250,500],
    'max_depth': [2, 4, 8, 16, 32, 64, None]
}
rf_cv = GridSearchCV(rf, parameters, cv=6)
rf_cv.fit(X_train, y_train.values.ravel())
print_results(rf_cv)
Again, we should store this best estimator for when we validate the random forest model against other models used:
joblib.dump(rf_cv.best_estimator_, '/.../.../.../EloScores/RF_model.pkl')
We can now fit our random forest model using the aforementioned parameters (as the recommended max_depth was “None”, this is set to default):
rf_model = RandomForestClassifier(n_estimators=500)
rf_model.fit(X_train, y_train)
rf_predicted_values = rf_model.predict(X_test)
We can now print the accuracy of the model:
print("Accuracy:",metrics.accuracy_score(y_test, log_y_pred))
>>> 0.7055039313795568
Multilayer perceptron
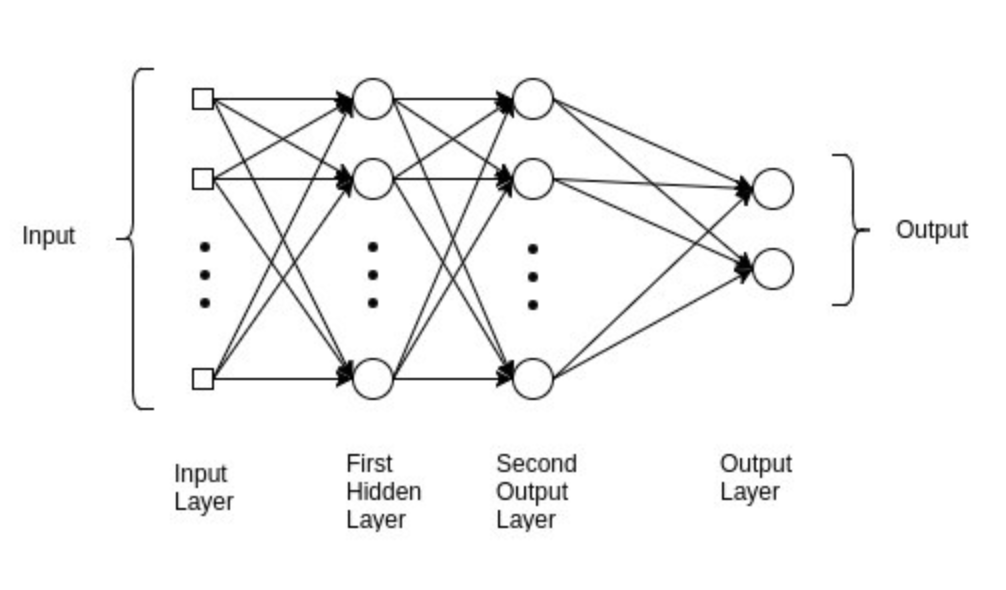
As you can see, we have improved the accuracy from our baseline logistic regression to ~71%. The final model we are going to fit is a multilayer perceptron (MLP), which is a class of feed-forward neural networks, meant to emulate the neurophysiological process by which the brain processes and stores information. MLPs are often utilised in supervised learning problems, where they train on a set of input–output pairs and learn to model the correlation between them. Training typically involves adjusting the parameters, or the weights and biases of the model, in order to reduce error between the desired and computed outcome. This method is commonly referred to as back-propagation, where randomly assigned weights and biases are recalibrated to reduce error after each forward–backward pass of an input parameter.
The multilayer perceptron consists of an input layer and an output layer and any number of hidden layers (which will be tuned according to the data you have available). At both your output layer and all of your hidden layers, an activation function is performed which passes the data on to either a subsequent hidden layer or to the final outcome of the individual classification (this is what “feed forward” pertains to; Figure 3). MLP is suitable for both classification and regression problems, but does not perform optimally on smaller datasets. The above description is heavily paraphrased and I recommend reading Nitin Kumar Kain, who explains MLP in more granularity.
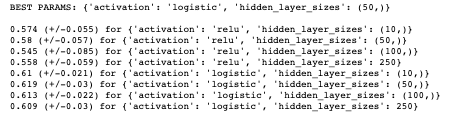
Before fitting our MLP model, we will tune some hyper-parameters, as we did for our logistic and random forest model. The print_results() function used before will print the optimal hyper-parameters for our MLP using the same training data.
The parameters we are going to optimise are hidden_layer_sizes, which is the number of nodes in the ith hidden layer and activation,which is the activation function for the hidden layer. For the activation function, we are going to determine which function is preferable between a logistic and relu activation:
Logistic: uses a sigmoid function (such as logistic regression), returns f(x) = 1 / (1 + exp(-x))
Relu: the rectified linear unit function, returns f(x) = max(0, x). If the value value is positive, this function outputs the input value, otherwise it passes a zero
mlp = MLPClassifier()
parameters = {
    'hidden_layer_sizes': [(10,), (50,), (100,),(250)],
    'activation': ['relu', 'logistic'],
}
mlp_cv = GridSearchCV(mlp, parameters, cv=5)
mlp_cv.fit(X_train, y_train.values.ravel())
print_results(mlp_cv)
Again, we should store this best estimator for when we validate the MLP model against other models used:
joblib.dump(rf_cv.best_estimator_, '/.../.../.../EloScores/MLP_model.pkl')
We can now fit our MLP model using the aforementioned parameters:
mlp_model = MLPClassifier(hidden_layer_sizes=(50,), activation='logistic')
mlp_model.fit(X_train, y_train)
mlp_predicted_values = mlp_model.predict(X_test)
We can now print the accuracy of the model:
print("Accuracy:",metrics.accuracy_score(y_test, log_y_pred))
>>> 0.6275911365260901
As with all of these models, there are any number of hyper-parameters you can fine-tune in order to best fit your data. With MLP, this can always come at the cost of over-fitting your data. Other hyper-parameters that are pertinent to successful tuning of an MLP include the number of epochs, batch size and methods of back-propagation, which are beyond the scope of this article but should be considered when training an MLP model.
Model validation and summary
As seen above, we split our data such that we had a validation set which would be used to compare models in the final stage of this assessment. This data is completely alien to any of the models used at the validation stage, so can be used as a strong gauge of the performance of the models we have trained. Furthermore, we have also been storing the best estimators using a variety of hyper-parameters for this purpose.
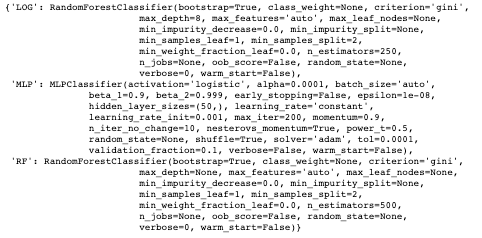
The following code will loop through your stored best estimators:
models = {}
for mdl in ['LOG','MLP', 'RF']:
    models[mdl] = joblib.load('/Users/hopkif05/Desktop/EloScores/{}_model.pkl'.format(mdl))
models
The three measures we are going to use to determine the performance of our models are:
Accuracy: the overall correct classifications (# predicted correctly / total # examples)
Precision: # correctly predicted 1s / total # predicted 1s
Recall: # correctly predicted 1s / total # of actual 1s
The following code will create a function to evaluate and compare the models used. As seen, the model.predict() function exists between both start and end-time functions, which means we can compute a latency value for each model, to assess how long they take to compute predictions:
def evaluate_model(name, model, features, labels):
    start = time()
    pred = model.predict(features)
    end = time()
    accuracy = round(accuracy_score(labels, pred), 3)
    precision = round(precision_score(labels, pred), 3)
    recall = round(recall_score(labels, pred), 3)
    print('{} -- Accuracy: {} / Precision: {} / Recall: {} / Latency: {}ms'.format(name,
                                                                                   accuracy,
                                                                                   precision,
                                                                                   recall,
                                                                                   round((end - start)*1000, 1)))
We can now loop through our models into this function:
for name, mdl in models.items():
    evaluate_model(name, mdl, X_val, y_val)
>>> LOG -- Accuracy: 0.693 / Precision: 0.686 / Recall: 0.779 / Latency: 44.1ms
>>> MLP -- Accuracy: 0.619 / Precision: 0.656 / Recall: 0.593 / Latency: 1.8ms
>>> RF -- Accuracy: 0.71 / Precision: 0.73 / Recall: 0.718 / Latency: 113.6ms
As seen from the above, our random forest model performs the best on unseen data, with the best accuracy and precision score; it does, however, take the longest to make predictions. This is OK for this relatively small dataset, but could be problematic if this were to increase in size. The other trade-off to consider regards precision vs. recall, as the two are typically inversely related. The logistic model scores higher for recall and latency, but, given the small dataset previously mentioned, we would allow for this in order to capitalise on the extra accuracy and precision. As with all validation, this comes down to the problem you are trying to solve and the suitability of the model. As can be seen, the MLP model performs the worst for all performance indicators, which could be down to a couple of factors. First, MLP performs inadequately on smaller datasets and may not be appropriate for the Elo score data used. Second, hyper-parameter optimisation for the MLP was fairly concise in the current assessment, given how many parameters can be tuned to optimise an MLP model. Future MLP modelling could consider optimising the number of epochs and/or batch size or methods for back-propagation.
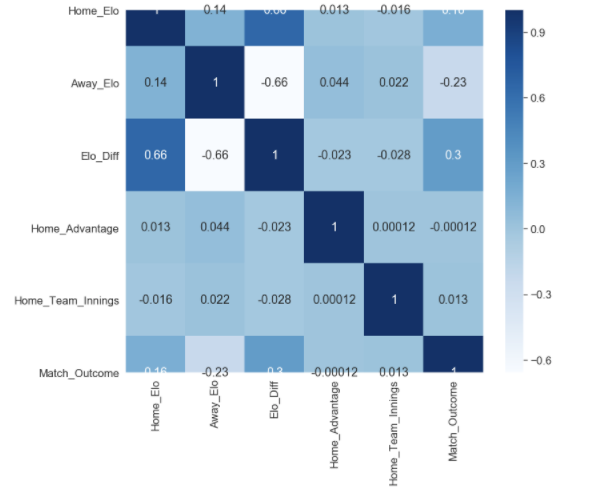
Finally, the quality of input variables should be considered. As seen in the correlation map below, the only remotely correlated variables to our match outcome measure (Match_Outcome) are related to Elo score (Home_Elo, Away_Elo and Elo_Diff). Given that additional metrics were used in order to enrich the Elo associated data, it could be that the additional feature variables (Home_Advantage and Home_Team_Innings) were not able to improve performance of the models used, and other variables should be considered.
plt.figure(figsize=(12,10))
cor = df.corr()
sb.heatmap(cor, annot=True, cmap=plt.cm.Blues)
plt.show
It can, however, be determined that our random forest model was able to achieve relatively high levels of accuracy (71%), precision (73%) and recall (71%) using Elo associated data, which in part validates the Elo ranking system in this given context. It would be worth experimenting with the K Value used in the Elo calculations; this coefficient mediates how reactive the Elo scores are in response to a win or loss, and should be altered according to the sporting context. I used a value of 22, which aligns with what I used for my IPL model, but this may have been too conservative in ODI cricket, which has been running for a longer period of time, and thus could be considered a more “predictable” format of the game.
